在我们进行WordPress前端用户中心功能开发的时候,经常会需要一些自定义字段来实现我们的需求,很多的插件可以实现我们的需求,今天路途吧分享的是免插件实现添加用户自定义字段(user_meta)到用户资料的教程。
今天我们来看一下怎么通过代码免插件实现添加用户自定义字段。
功能截图
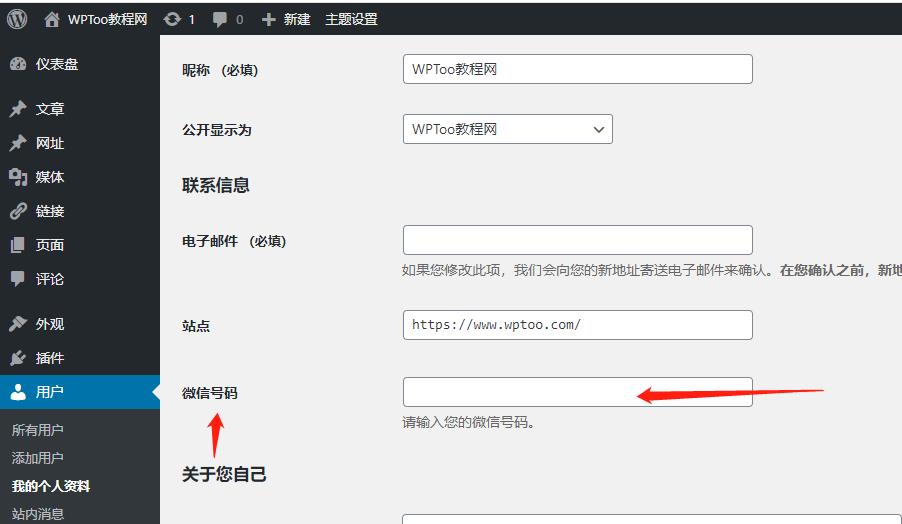
添加用户自定义字段
首先我们在用户资料编辑页面添加一行“微信号码” 的自定义字段。直接把下面的代码复制到主题的functions.php文件中,即可在用户资料编辑页面看到一个“QQ号码”的表单项。
add_action( \'show_user_profile\', \'wizhi_extra_user_profile_fields\' );
add_action( \'edit_user_profile\', \'wizhi_extra_user_profile_fields\' );
add_action( \'personal_options_update\', \'wizhi_save_extra_user_profile_fields\' );
add_action( \'edit_user_profile_update\', \'wizhi_save_extra_user_profile_fields\' );

function wizhi_save_extra_user_profile_fields( $user_id ){
if ( !current_user_can( \'edit_user\', $user_id ) ) { return false; }
    update_user_meta( $user_id, \'wx_username\', $_POST[\'wx_username\'] );
}

function wizhi_extra_user_profile_fields( $user ){ ?>
<h3>附加用户字段</h3>

<table class=\"form-table\">
    <tr>
        <th><label for=\"wx_username\">微博用户名</label></th>
        <td>
            <input type=\"text\" id=\"wx_username\" name=\"wx_username\" size=\"20\" value=\"<?php echo esc_attr( get_the_author_meta( \'wx_user_name\', $user->ID )); ?>\">
            <span class=\"description\">请输入微博用户名。</span>
        </td>
    </tr>
</table>
<?php }?>
调用自定义字段
添加好了用户自定义字段后,改如何获取使用这个字段呢,获取的方法也很简单,示例代码如下:
<?php
$current_user = wp_get_current_user();
get_user_meta( $current_user->ID, \'wx_username\', true);
?>
今天的wordpress教程对您有没有一些帮助呢?如果有的话请分享给其他需要的朋友。
版权声明:原创作品,未经允许不得转载,否则将追究法律责任。
本站资源有的自互联网收集整理,如果侵犯了您的合法权益,请联系本站我们会及时删除。
本站资源仅供研究、学习交流之用,若使用商业用途,请购买正版授权,否则产生的一切后果将由下载用户自行承担。
本文链接:找资源网https://www.zhaoym.cc/26398.html
许可协议:《署名-非商业性使用-相同方式共享 4.0 国际 (CC BY-NC-SA 4.0)》许可协议授权
本站资源有的自互联网收集整理,如果侵犯了您的合法权益,请联系本站我们会及时删除。
本站资源仅供研究、学习交流之用,若使用商业用途,请购买正版授权,否则产生的一切后果将由下载用户自行承担。
本文链接:找资源网https://www.zhaoym.cc/26398.html
许可协议:《署名-非商业性使用-相同方式共享 4.0 国际 (CC BY-NC-SA 4.0)》许可协议授权

评论0+